UPDATE: As mentioned by Xavi on the comment below, routes are now a premium feature that’s available on Foundation plan and above starting from $35/month.
When you first registered for a domain, the first thing that came to mind is how do you set up your email address account with your own custom domain name.
While Google makes it easy for you to do that with its GSuite, the downside is you have to pay $5/user/month. It doesn’t seem much but it’s still a cost you have to bear, especially when you need more than 1 email address.
I’ve been using my own custom domain in Gmail for years without paying anything, thanks to Mailgun.
Before you could start with this tutorial, you’ll need to get a domain name registered. I always buy my domain name from NameCheap as it’s reliable and you’ll get 1-year FREE WhoisGuard.
Find a domain starting at $0.48
powered by Namecheap
Disclosure: This is an affiliate link. If you choose to buy through my link I will get a small commission at no extra cost to you. Thank you so much for the support.
The Whois database is accessible to anyone on the internet. What does it mean to you?
It means:
When you register a domain, you are exposing your personal information such as name, address, email and phone number to spammers, marketing firms, and online fraudsters.
WhoisGuard was designed to protect you, the domain owner, so your confidential information is no longer available for public consumption.
In this post, I’m going to show you how you could configure your Mailgun account and connect it to your Gmail.
Keep reading.
Why Custom Domain Email Address?
There are no definite reasons why you have to use a custom email address.
But when you start a blog or a business, using a custom email address makes you look more credible and professional.
Too many times I’ve seen bloggers are using a generic email address.
Imagine you get an email from [email protected] and [email protected]. Which email do you think you’ll more likely to open and respond to?
You’re right.
A professional or branded email address will increase your email open and engagement rate.
You can create different email addresses for specific needs. For example, I created [email protected] for my general contact form. Besides that, I also created [email protected] for my personal email address.
Custom email address makes your business more memorable to your target audience.
It helps to build your brand.
[clickToTweet tweet=”Having a custom domain email address helps to build your brand.” quote=”Having a custom domain email address helps to build your brand.”]
Setting up Mailgun Account
Instead of paying for a Google Apps account, there’s a way to add your domain to Gmail for free.
Here comes Mailgun!
![]() Mailgun is a service that allows you to send, receive and track email automatically. Its free plan allows you to send or receive up to 10,000 emails a month.
Mailgun is a service that allows you to send, receive and track email automatically. Its free plan allows you to send or receive up to 10,000 emails a month.
[clickToTweet tweet=”Start using Mailgun and use a custom domain email address with your Gmail for free.” quote=”Start using Mailgun and use a custom domain email address with your Gmail for free.”]
Now, you can use your Gmail account with a custom domain email address…
… your domain.
Head down to Mailgun and sign up for an account.
Make sure you sign up with your Gmail or other email accounts you have access to.
Don’t use an email account with your custom domain to register. If you do, you will encounter a problem verifying your account.
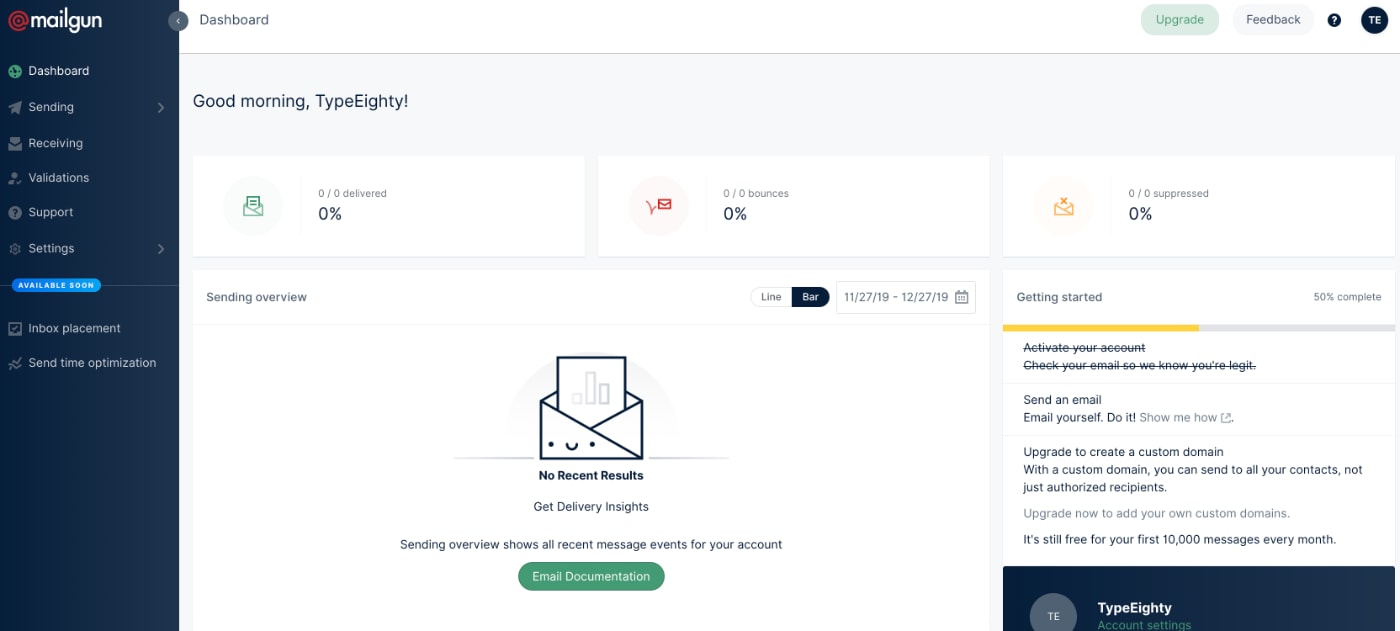
Once you’ve verified and activated your account, your dashboard should look something like this.
Next, you need to add your domain to Mailgun.
To create a custom domain, you need to update your Free plan to Concept plan — which still lets you sent up 10,000 emails per month for free. Click on the link the the “Getting Started” box to upgrade your account.

Next, simply key in your payment detail.

You can click on “Domains” link under Sending” to view list of domains on your account. Next “Add New Domain” button to add a new domain.

Type in your domain name and click “Add Domain” button.

By default, Mailgun recommends you to use a subdomain instead of the root domain, for example, “mg.typeeighty.com” instead “typeeighty.com”.
But after checking out their FAQ page, Mailgun recommends you to use the root domain if you’re not using it for any corporate email so I advise using the root domain when adding a new domain.
Update Your Domain Name Server (DNS)
Next, Mailgun will prompt you to verify your domain.
You need to update your DNS Records for sending and receiving emails with Mailgun and for tracking activities such as opens, clicks and unsubscribes.
Go to the DNS provider that you use to manage your domain and add the DNS records provided by Mailgun and wait for the domain to verify successfully.
If you followed my previous post, I am using Google Cloud’s Cloud DNS to manage my domain DNS.
When you’re done with this step, this is how your DNS records should look like more or less.

As you can see I added:
- MX records that specify how the email should be routed with the SMTP server.
- TXT records that are known as SPF and DKIM that’s required for sending and receiving emails with Mailgun.
- CName record is optional. You could add this if you want to track opens, clicks and unsubscribes.
Once you have updated your DNS records, go back to the Domains page and click on your domain.
Scroll down to the “Domain Verification & DNS” section and click on it to expand the tab.
Finally, click on the “Check DNS Records Now” and you should see green checks on each of the records indicating that your domain is verified.
Then click on the big “Domain Verification & DNS” header to expand it, and click the “Check DNS Records” Now button.
You should see green checkmarks on the MX and TXT records indicating that setup was successful.

Setting up SMTP Credentials
Now that your domain has been verified. It’s time to add some email addresses.
Go to your Dashboard, scroll down till you see your domain name and click on “Domain Setting”.

Click “SMTP Credentials” and you should see all the credentials you added for the domain. To add new credentials, click on “New SMTP User” button.

Enter the new login name.
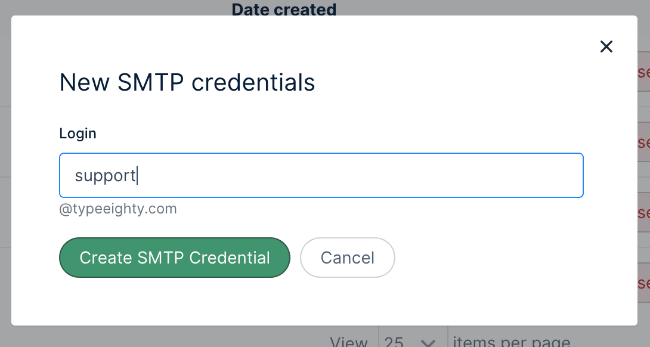
Once created, you’ll see a notification status with the generated password.

Setting up Email Forwarding
This step is one of the important steps you need to do to make sure your Gmail account can receive emails to the custom email addresses your created earlier.
Email forwarding basically will forward emails that the server received to the specified address.
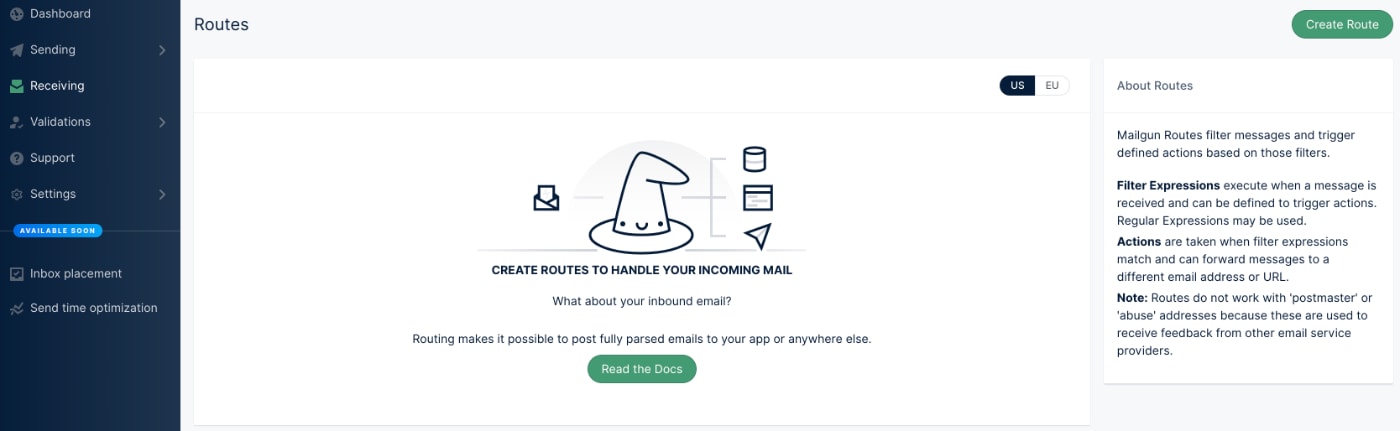
In Mailgun, you do this with Routes.
Click on “Receiving” on the sidebar to view the list of routes and click on the “Create Route” button to create a new route.
If you’re like me, just launched your site and you’re doing everything by yourself.
I would create a route that would catch all emails sent to my custom domain and forward all those emails to my Gmail account.
This means emails sent to [email protected] and [email protected] will be forwarded to my Gmail account.
Let’s create a new route for that.

This is the simplest route. Just check the “Forward” checkbox, enter your Gmail address and set Priority to 1.
And you’re all set!
This setup works fine for me right now. But as my team is growing, I might want to assign a different team member to handle different email address or I might set up another email address from another team member.
When that happens, our “Catch All” route won’t work as it should be anymore.
I will need to apply multiple different routes so that emails can be forwarded to its respected recipient.
This is an example of a route that I would implement in the future to accommodate that.

So I might assign a team member or a virtual assistant to handle any inquiries sent to [email protected] or [email protected] for example.
Note: Routes are evaluated in the order of priority from the lowest value to the highest value.
Routes that have the same priority value are evaluated by the date of creation, with newer routes having a higher priority.
The good thing about Mailgun’s Route is that it’s easy to test the route and check where the email will be forwarded to.
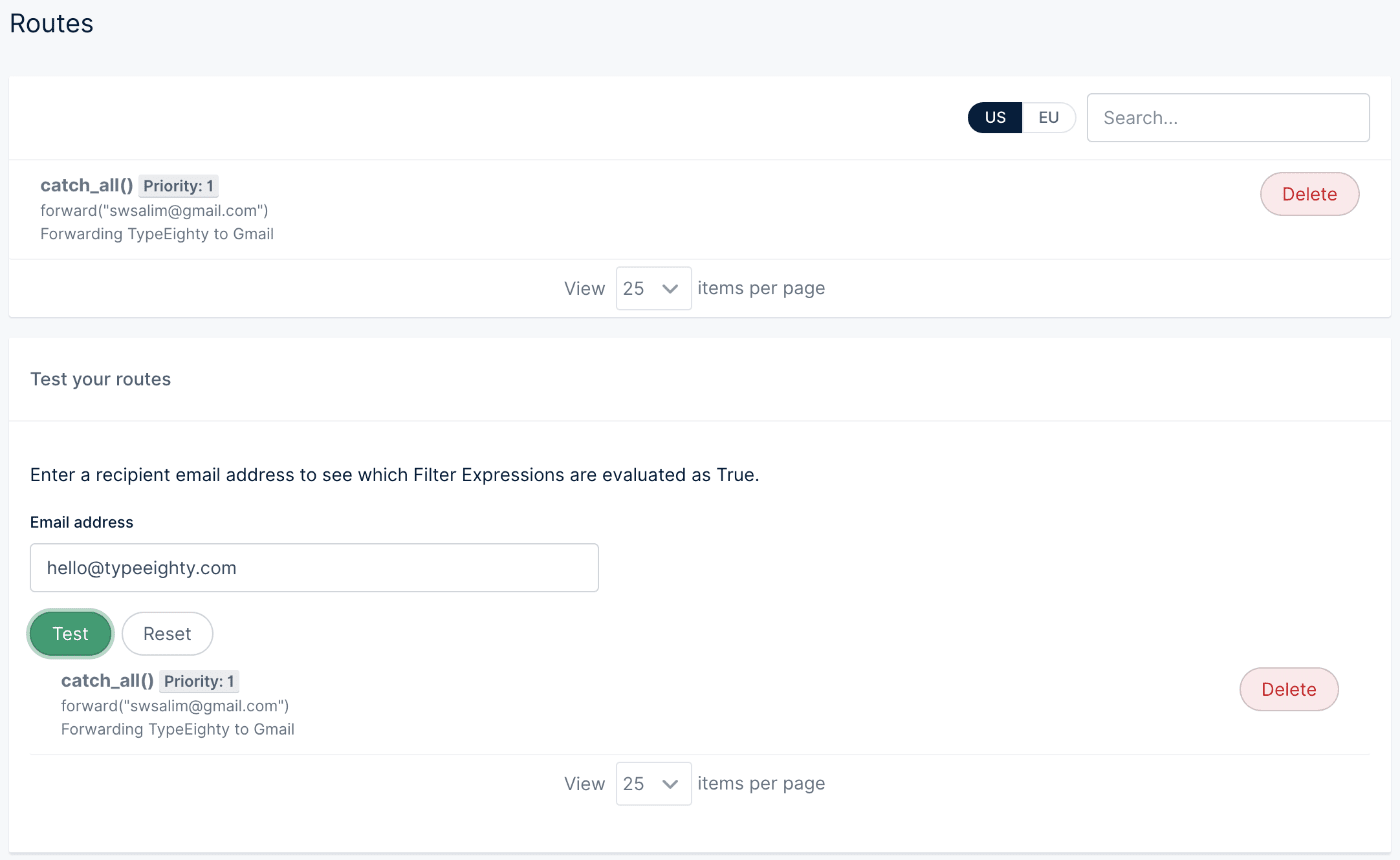
As you can see, once I added the new route and set it to lower priority, the new route will take effect.
[clickToTweet tweet=”Mailgun makes it easy to receive and forward emails.” quote=”Mailgun makes it easy to receive and forward emails.”]

Setting up Custom Email Address on Gmail
Now you can receive emails on a custom domain and Mailgun will forward emails to your Gmail account.
What about sending email from your custom domain?
Let’s add those email address to your Gmail account.
Go to “Accounts and Import” in the Gmail setting. Click on “Add another email address”.

Enter the custom email address you created earlier. Click “Next Step”.

Enter the following settings:
SMTP Server: smtp.mailgun.org
Port: 587
Username: The full email address, e.g [email protected]
Password: Enter the password you used to create the email address in Mailgun
Click “Add Account”.
You’ll need to enter the confirmation code that Google sent to the email address which is forwarded to your Gmail.
Voila!
You’re done.
[clickToTweet tweet=”Do you know you can add other email address to your Gmail? No more switching emails.” quote=”Do you know you can add other email address to your Gmail? No more switching emails.”]
How to Send Email from Your Custom Domain?
Now that you’ve added a custom domain email address to your Gmail account. How do you send email from the new email address?
First, head down to Gmail web version, http://gmail.com.
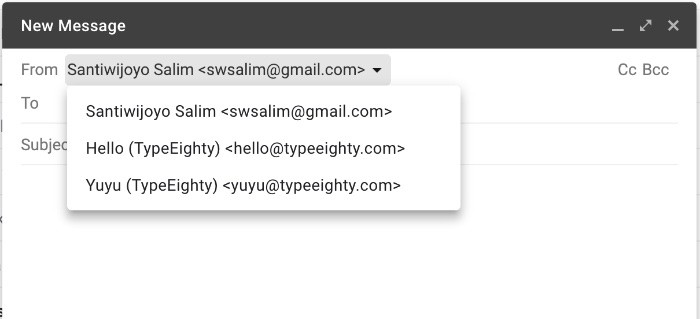
Simply compose a new email or reply to any email.
Click on the “Recipient”, you should see the new email addresses.
Final Thoughts
Having a custom email address is important for you and your business.
It helps to build your audience, branding and makes you look more credible.
With service such as Mailgun, you’ve saved at least $5/month for a branded email address.
All you need to do is register for a domain name.
Now you can send email using custom domain right from your Gmail for free up to 10,000 emails a month!
If you found this post useful, do help us share this on social media. Much appreciated! 🙂
And leave a comment below, if you have any question.
Quick heads up, Mailgun is no longer free:
“Routes is a premium feature, only available for users on plans Foundation and higher.”
Plans start at $35/month. If anyone finds a solution please let me know 😊
Thanks for the heads up, Xavi. Added this price change on the post.
Same issue here, address not found when trying to send a test e-mail.
Great guide – thank you for your efforts!
Hi Yuyu! Wow, thank you so much for this excellent tutorial–all is working very well for me. Thanks!
Great to hear that, Jeff!
I have followed the steps all the way to the forwarding step. I have done a test email after the catch all step and i can receive it , I get an error message in return. Any ideas what to do to make sure the email has been registered? I added a new STP and got a password when i did so im unsure what else I need to do any tips appreciated.
Thank you! really helpful article
this is the error im getting when I send a test email:
Message blocked
Your message to [email protected] has been blocked. See technical details below for more information.
The response from the remote server was:
550 5.4.1 Recipient address rejected: Access denied [SY3AUS01FT010.eop-AUS01.prod.protection.outlook.com]
Hi Natalia, thanks for following up. Let me check on the issue that you and Andrew described.
Hi Yuyu,
Thanks for this article! I don’t know if you’ll still see comments here, but if so, I’m having some trouble. I followed all the instructions up to creating a route to forward to my gmail. But when I tried to add the new email address (that I created on Mailgun) to my gmail, I’m running into a problem. Gmail wants to send a confirmation code to the address I am trying to add, but those emails are not going through. The error message is “550 No Such User Here”.
I tried sending a test email from another address to my custom domain address, and got the same message. So it seems my new email address is not able to receive emails. Any tips?
Thanks!
Hi Andrew, sorry for the late reply. I’m still around but my website encountered some issues for the past few weeks. Let me run through the scenario you described.
Hi Andrew im having a similar issue did you find a solution?
It has been more than 12 hours making DNS changes, but still DNS settings have not been verified. Does it really take 24-48 hours or it can happen before or I have made any mistake while adding the settings?
It shouldn’t really take that long normally. You could check the status of your DNS propagation here: https://www.whatsmydns.net/.
If you’re not sure, I could take a look at your DNS settings.
Great article Yuyu. This works well with sending mails to another gmail account. I am having problems sending to yahoo and outlook. I’ve also tried sending to my work mail and it didn’t go through either. Any ideas what the problem might be?
Upon checking the logs in mailgun, here’s what I found.
Server response: 550 5.7.1 Unfortunately, messages from [104.130.122.30] weren’t sent. Please contact your Internet service provider since part of their network is on our block list (S3140). You can also refer your provider to http://mail.live.com/mail/troubleshooting.aspx#errors. [BY2NAM01FT017.eop-nam01.prod.protection.outlook.com]
Any ideas how to overcome this? Is mailgun server blocked from other mail providers?
Hi Alonso, I’ve never really encountered that with Yahoo and Outlook. Did you follow all the steps? Any warning with your DNS settings? Did you send tons of emails?
Fantastic post. Thank you Yuyu
What about if one of your team members wants to send emails from that domain, how would the SMTP part of the Gmail setup work?
Once you’ve set up the custom email address on Gmail, simply compose an email using the web Gmail version. Click on the “Recipient”, you should see the email address you added earlier.
Choose that custom email address, and you should be sending email from that domain.
I’ll update the article with this information 🙂
Nice guide.
I have a question. Can i add my own domain / gmail to microsoft outlook 2016? how can i do it?
There are 2 parts to your questions. If by your own domain, you’re referring to the email address created on Mailgun, you CAN’T add it to Microsoft Outlook 2016.
However, you can add your Gmail account to Outlook 2016. Check out this article to find out more: https://officesmart.wordpress.com/2016/01/26/how-to-add-multiple-accounts-in-outlook-2016/
Oh this is great. This is really helpful. Bookmarked! Thanks for sharing ♥️ ♥️ By any chance you are interested on doing collaborations, you can check out the collaborations portal of Phlanx.com and connect with amazing brands!
Xoxo,
Tiffany
Thanks for this. I thought I had to pay to have a custom domain!
You’re welcome, Sheila. Let me know if you need any help!
I am not familiar with Mailgun but it seems to be for transactional emails. Do they allow normal email too?
Hi, there. Yep, Mailgun works with normal email as well based on my experience.
great solution, but when i send emails from my custom domain in gmail according to your post, they end up landing in the updates tab of inboxes of people i send it to. this may pause un open email or lost or unseen email very often.
do you have a way to go around this problem ?
Hi Sira, thanks for your comment. Does it happen to any email you sent from your custom domain? What kind of email are you sending out? Could you try to send it to my email at [email protected]? I could look into that.
Such a great walk-through post about how to have your own email address. Great information and the screenshots will be very helpful for people to follow!
Thanks, Heather. Hope it would be helpful for your audience too 🙂
This is very nice, I was not aware of all these email services, I had the G-Suite but was not aware about all the other options
I have never witnessed such article before.
I have bookmarked this post. I think I’ll have to come back and set up mine. Thanks for sharing this.
Thank you. Feel free to reach out to me if you need any help with it.
Really informative.
Nice post
Great guide. I use Gmail and have done for years, yet not once did I think to consider them for my custom domain! Bookmarked for future use.
Thanks, Tom. Hope it would help you in the future.
I would be updating the series with more useful tips and tricks. Will keep you posted.
Thank you for sharing. I have used gmail with custom domain before, but had no idea how to set it up and it’s much more affordable than buying an email service from your host or other services. I pinned this.
It really is. I managed to save up on some cost with this.
I have a custom email address @ my domain from 1&1 and I forward it to Gmail since I don’t like the 1&1 interface. I’m going to come back to your article to figure out how to get it so I can send emails through Gmail as well as that would be super handy! Thanks for sharing.
Thank you, Helen. I agree, being able to sends email right from my Gmail account is super convenient.
Congratulations! I have nominated your blog for the Liebster Award. Check out my blog for more information: http://www.gadgetsinfotech.com/my-first-online-blog-award-liebster-award/
Great news to end the weekends, Sunil. Thank you for the nomination! Exciting week ahead. 🙂