Do you want to change font size in WordPress posts and pages? You don’t have to worry about it anymore.
Research published in 2013 shows that font size has a significant effect on reading comprehension.
In this post, I’m going to show you how exactly to change your font size in WordPress — step-by-step.
Method 1: Using the Visual Editor’s Paragraph Headings
When writing your content in the visual editor mode, you can easily change your font size from paragraph to heading. It’s useful when you want to use a bigger font size for headings or subheadings to make your content easier to read.
To do that, make sure you’re in the Visual Editor mode. Click the dropdown called “Paragraph”. You can see all the available options and change the font size accordingly.
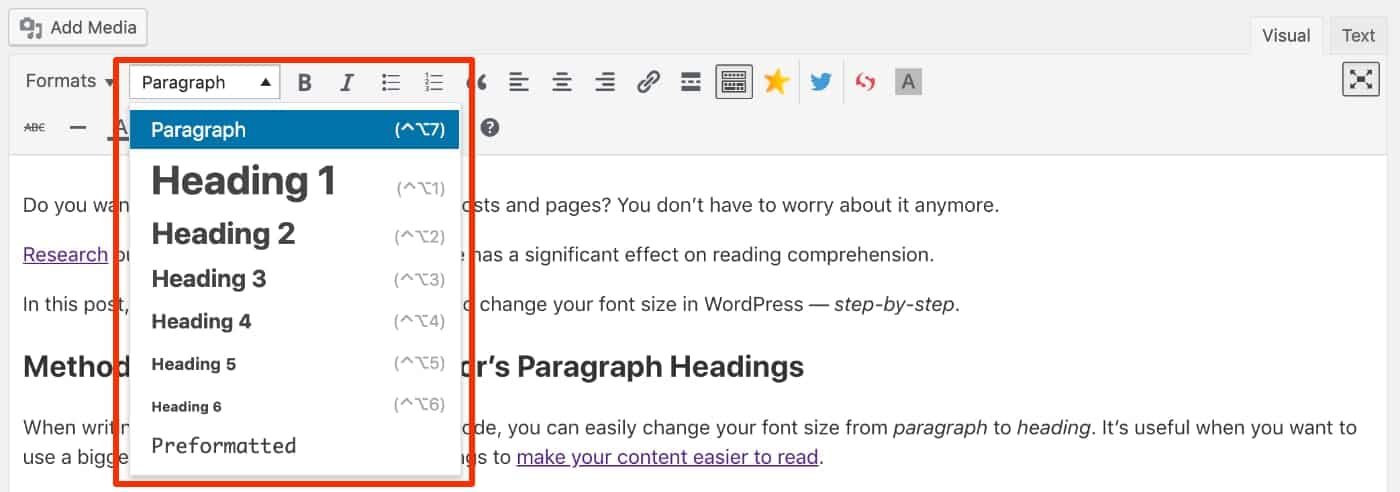
Look:
This method actually applies the heading tags to your content namely h1, h2, h3, h4, h5, or h6.
The actual font sizes are controlled by your theme’s stylesheet — style.css.
Take a minute to understand the basis of perfect on-page SEO and use subheadings to boost your SEO.
Method 2: Using the TinyMCE Advanced Plugin
For the second method, you could install TinyMCE Advanced plugin. This is an overly popular plugin — with over 2+ million downloads — to extend the functionality of the default TinyMCE editor.
With recent major release of version 5.0, it provides full support of the new Block Editor (Gutenberg). With this plugin, you can change both font family and font size without changing the heading tags.
Sounds good?
To get started, install and activate the plugin. For more details, see our step by step guide on how to install a WordPress plugin.
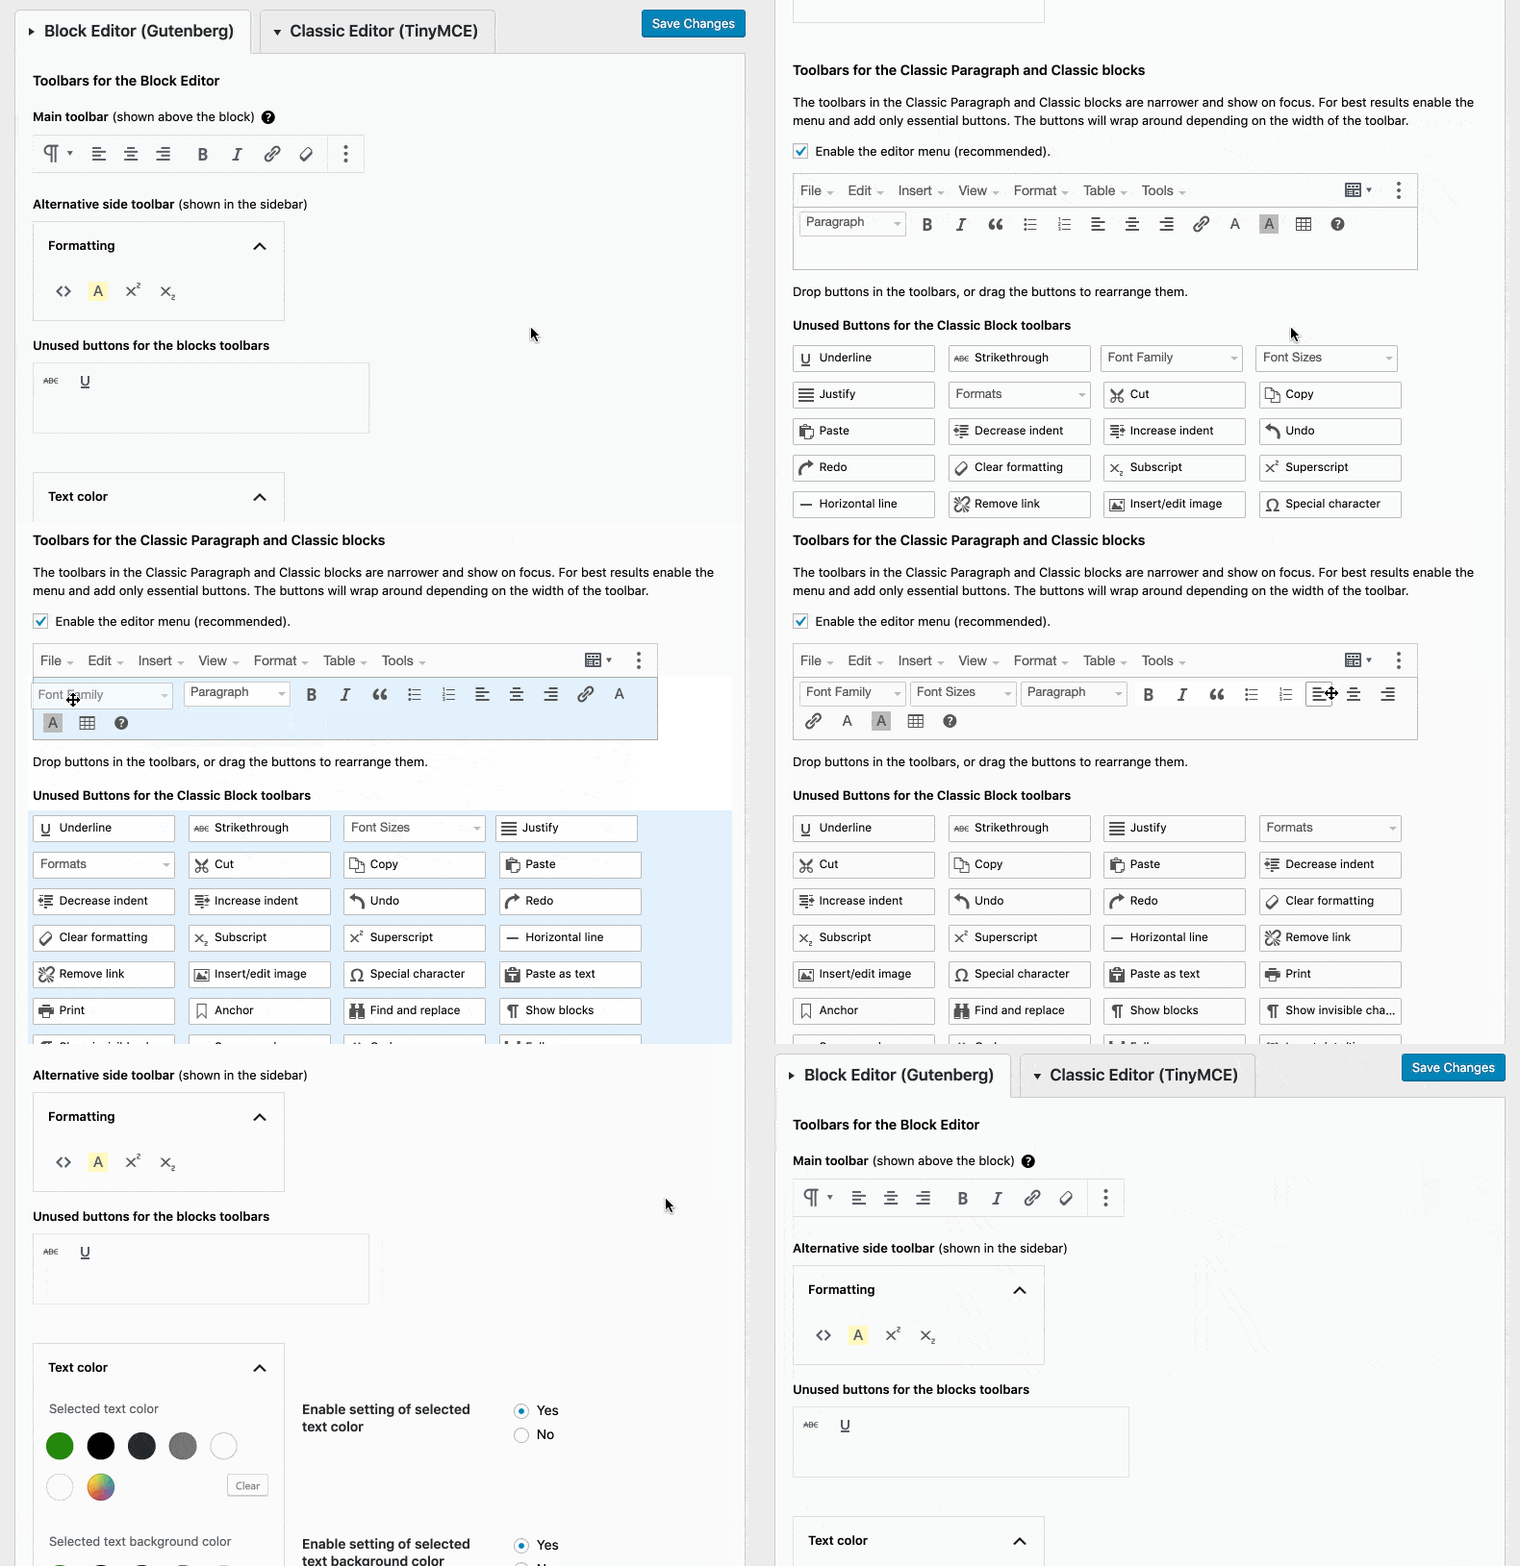
Once activated, go to Settings > TinyMCE Advanced > Classic Editor (TinyMCE) and configure the editor settings. You should see the TinyMCE Editor toolbar with and without buttons and also a list of all the unused buttons.
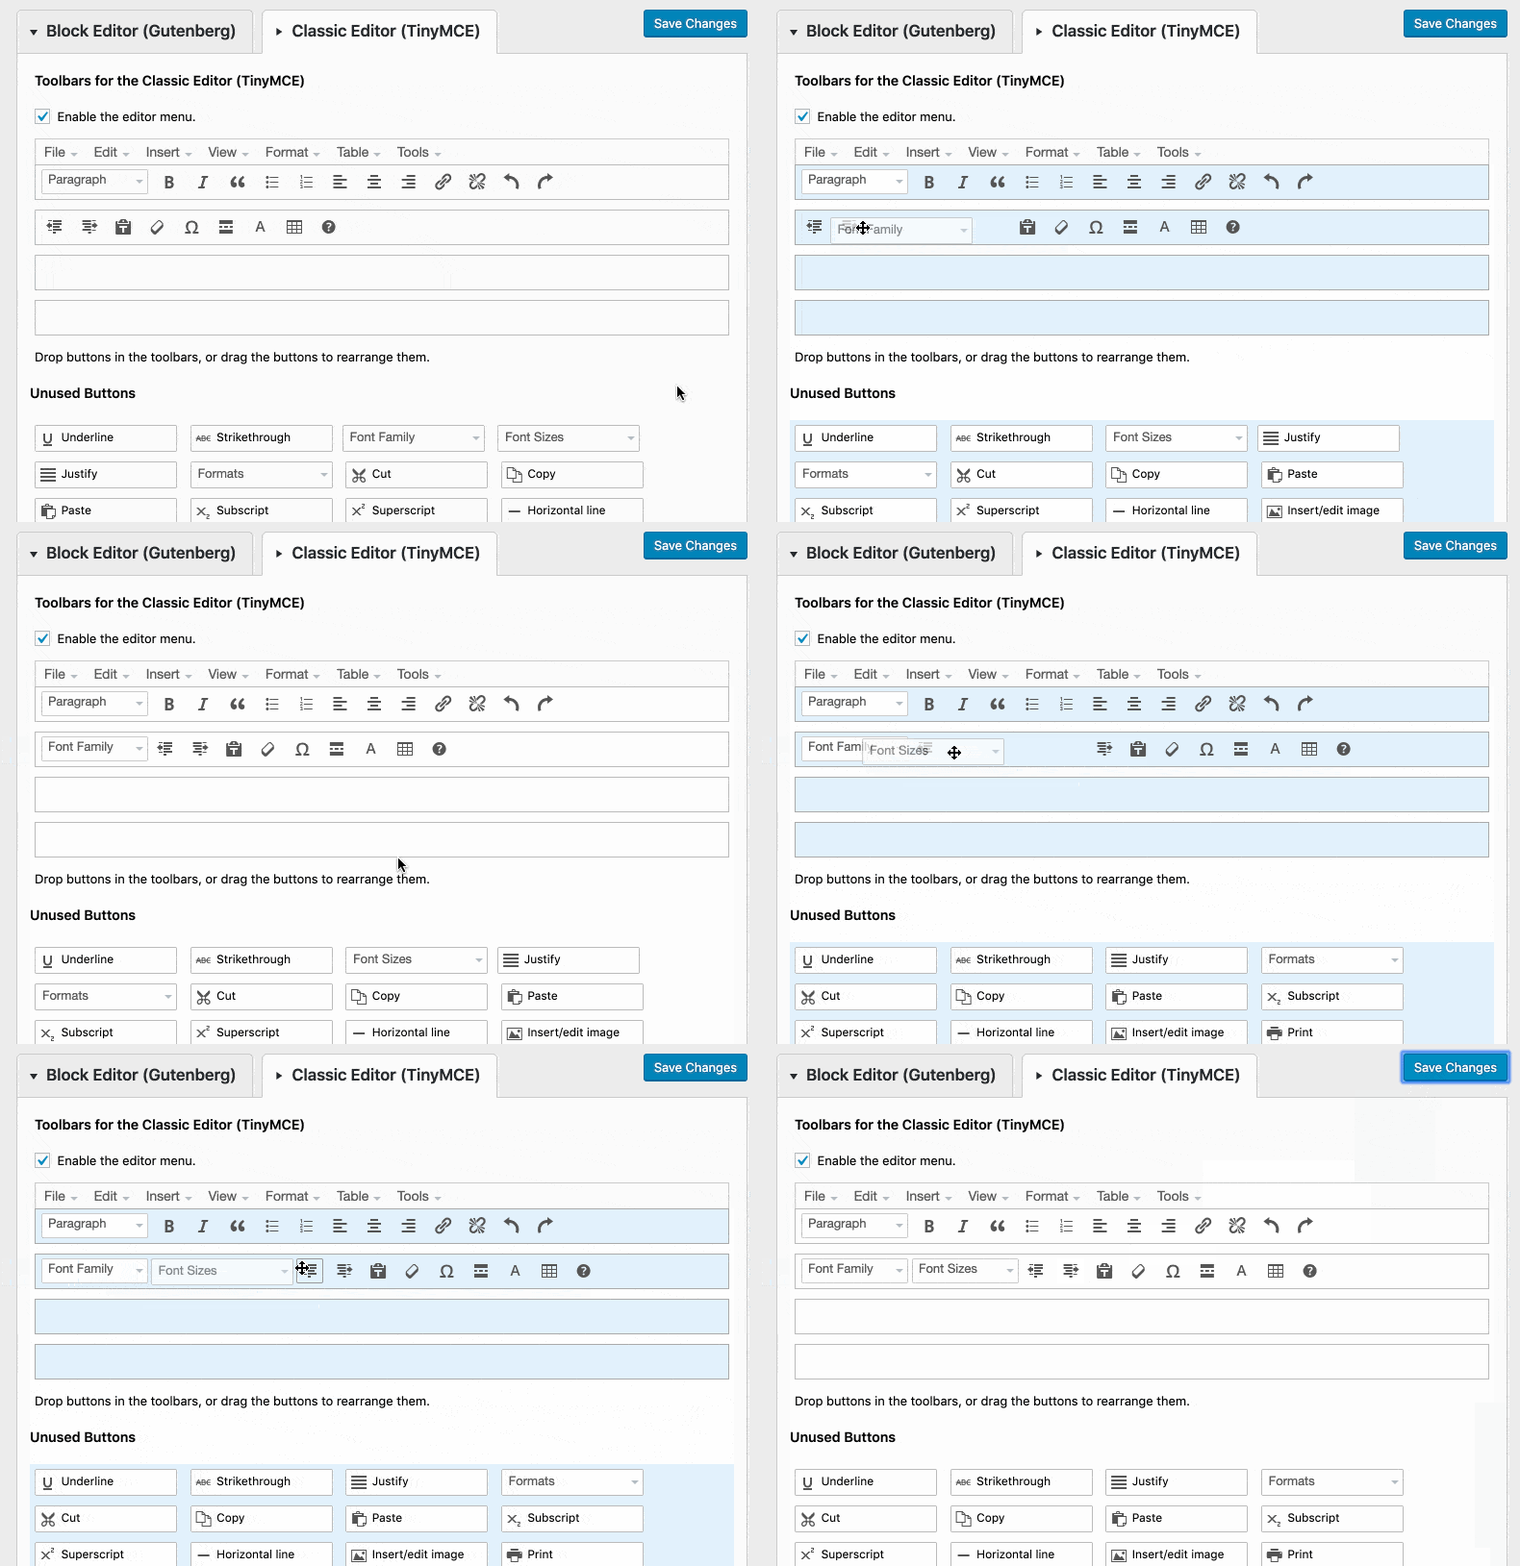
Drag and drop the “Font Family” and “Font Sizes” buttons from the Unused Buttons section to any of the toolbars.
And, press “Save Changes”.
Now, you can create a new post or edit an existing post to try it out. You’ll notice that the plugin replaces the default TinyMCE editor in Visual Editor mode.

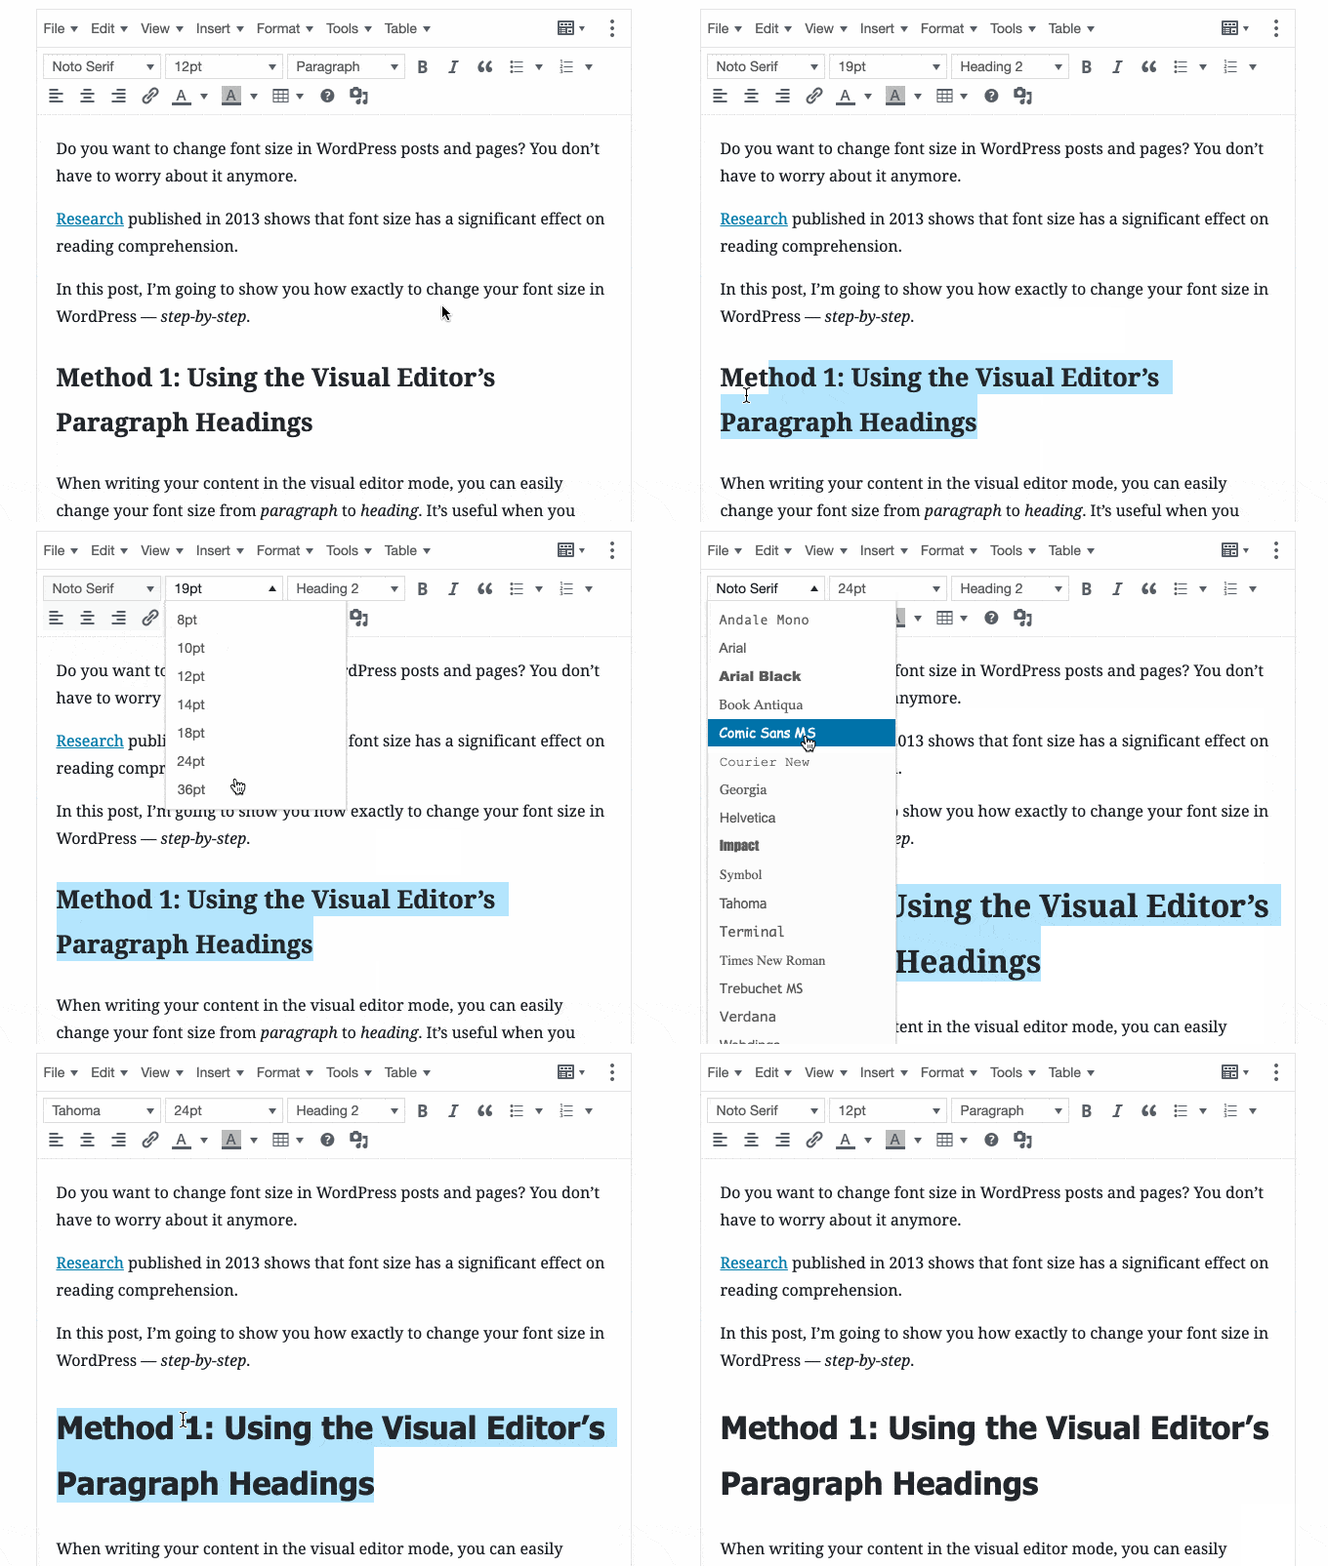
The new editor gives you extra flexibility to change the font family and font size. You could change font size without using heading tags now.
Go ahead, select a text from your editor. You can either change the font family or font size or both. Select any font size from the dropdown.
If you don’t select a text, only the current word will be updated.
Give it a try now.
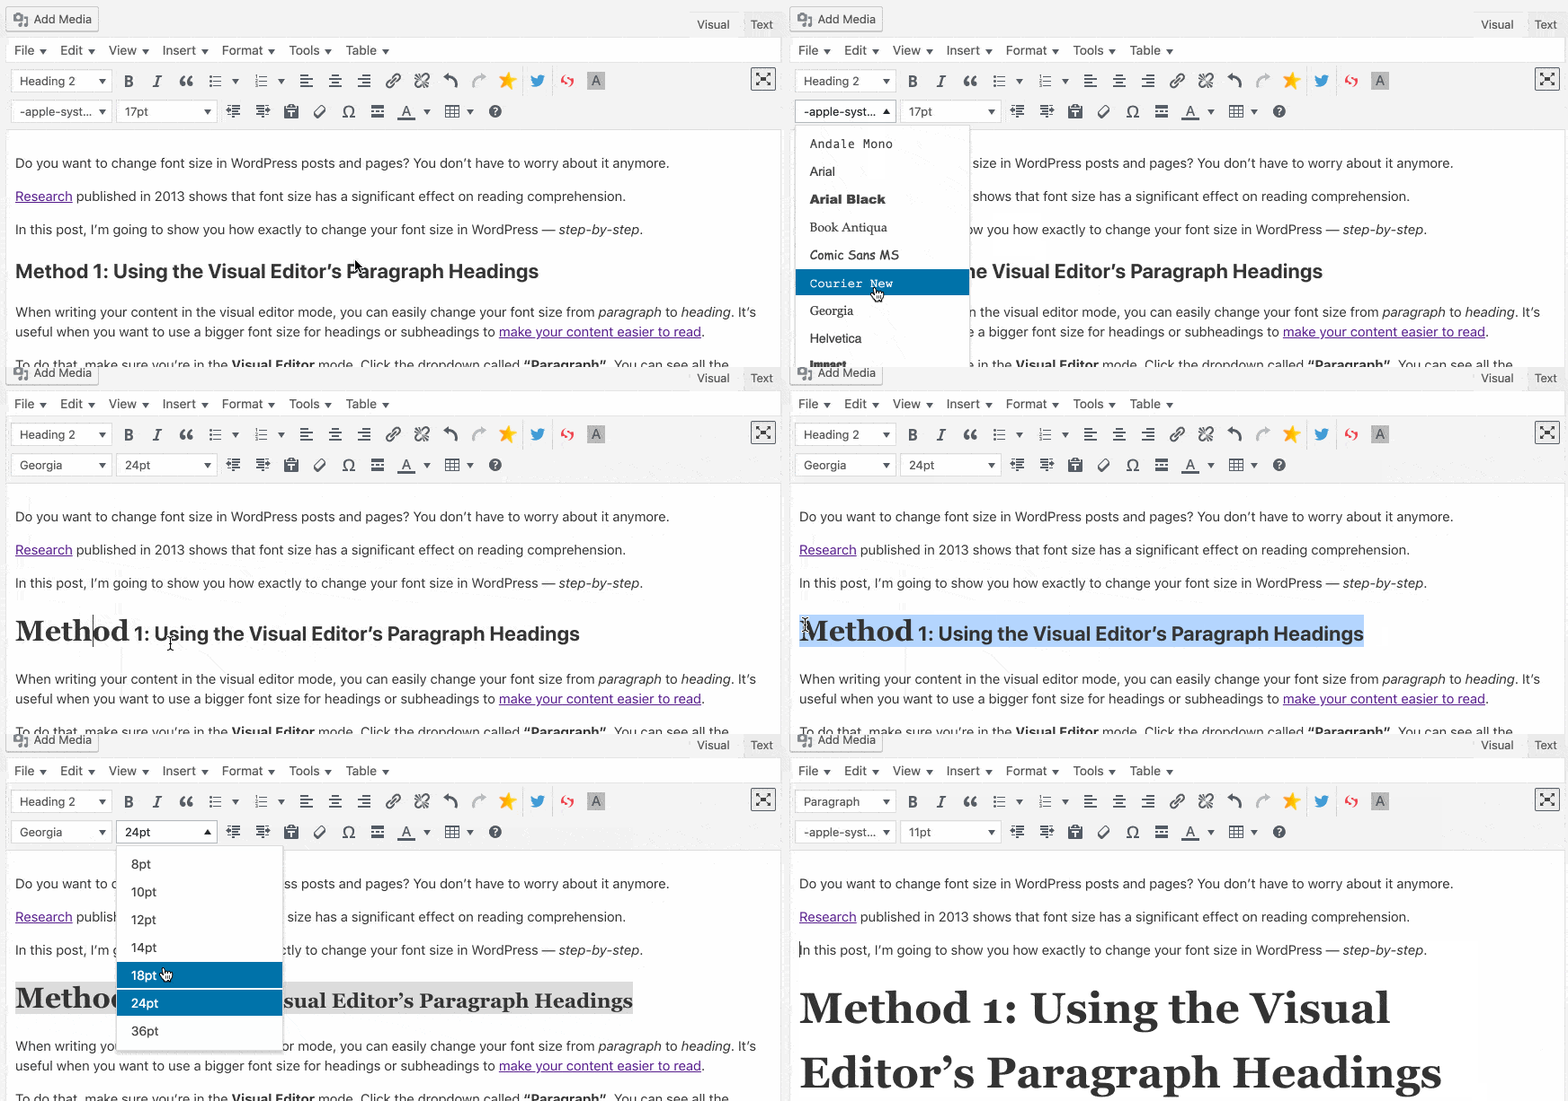
The font size is updated now.
Gutenberg Editor
If you’re using the Gutenberg editor, go to Settings > TinyMCE Advanced > Block Editor (Gutenberg). Scroll down to “Toolbars for the Classic Blocks in the Block Editor (Gutenberg)”. Follow the steps above to add “Font Family” and “Font Sizes” to the toolbar.
Now, you can change the font size and font family on the Classic block.
A word of caution:
The downside of using this plugin is it introduces inconsistency — as your blog grows bigger. TinyMCE Advanced plugin works by applying the changes directly on the posts or pages. Making it easy to lose track of the changes you made over time.
And it’s a pain to undo all those changes.
Think about it this way.
You updated the font size and/or font family in a bunch of posts and pages. Everything looks great. One day you decided to change your blog theme and suddenly these “font sizes” don’t look so great anymore. And you want to remove those changes you made.
Sadly, there’s no easy way to remove those changes. So if you planned to update font size or font family in many contents, there’s a better way to do that.
Method 3: Using Inline CSS
If you don’t like the idea of installing a plugin to change font size, it’s time to get your hand dirty — with codes. The first method is using inline CSS.
You might ask, what’s inline CSS?
Inline CSS is a term used to refer to CSS that’s applied to the current element — single element.
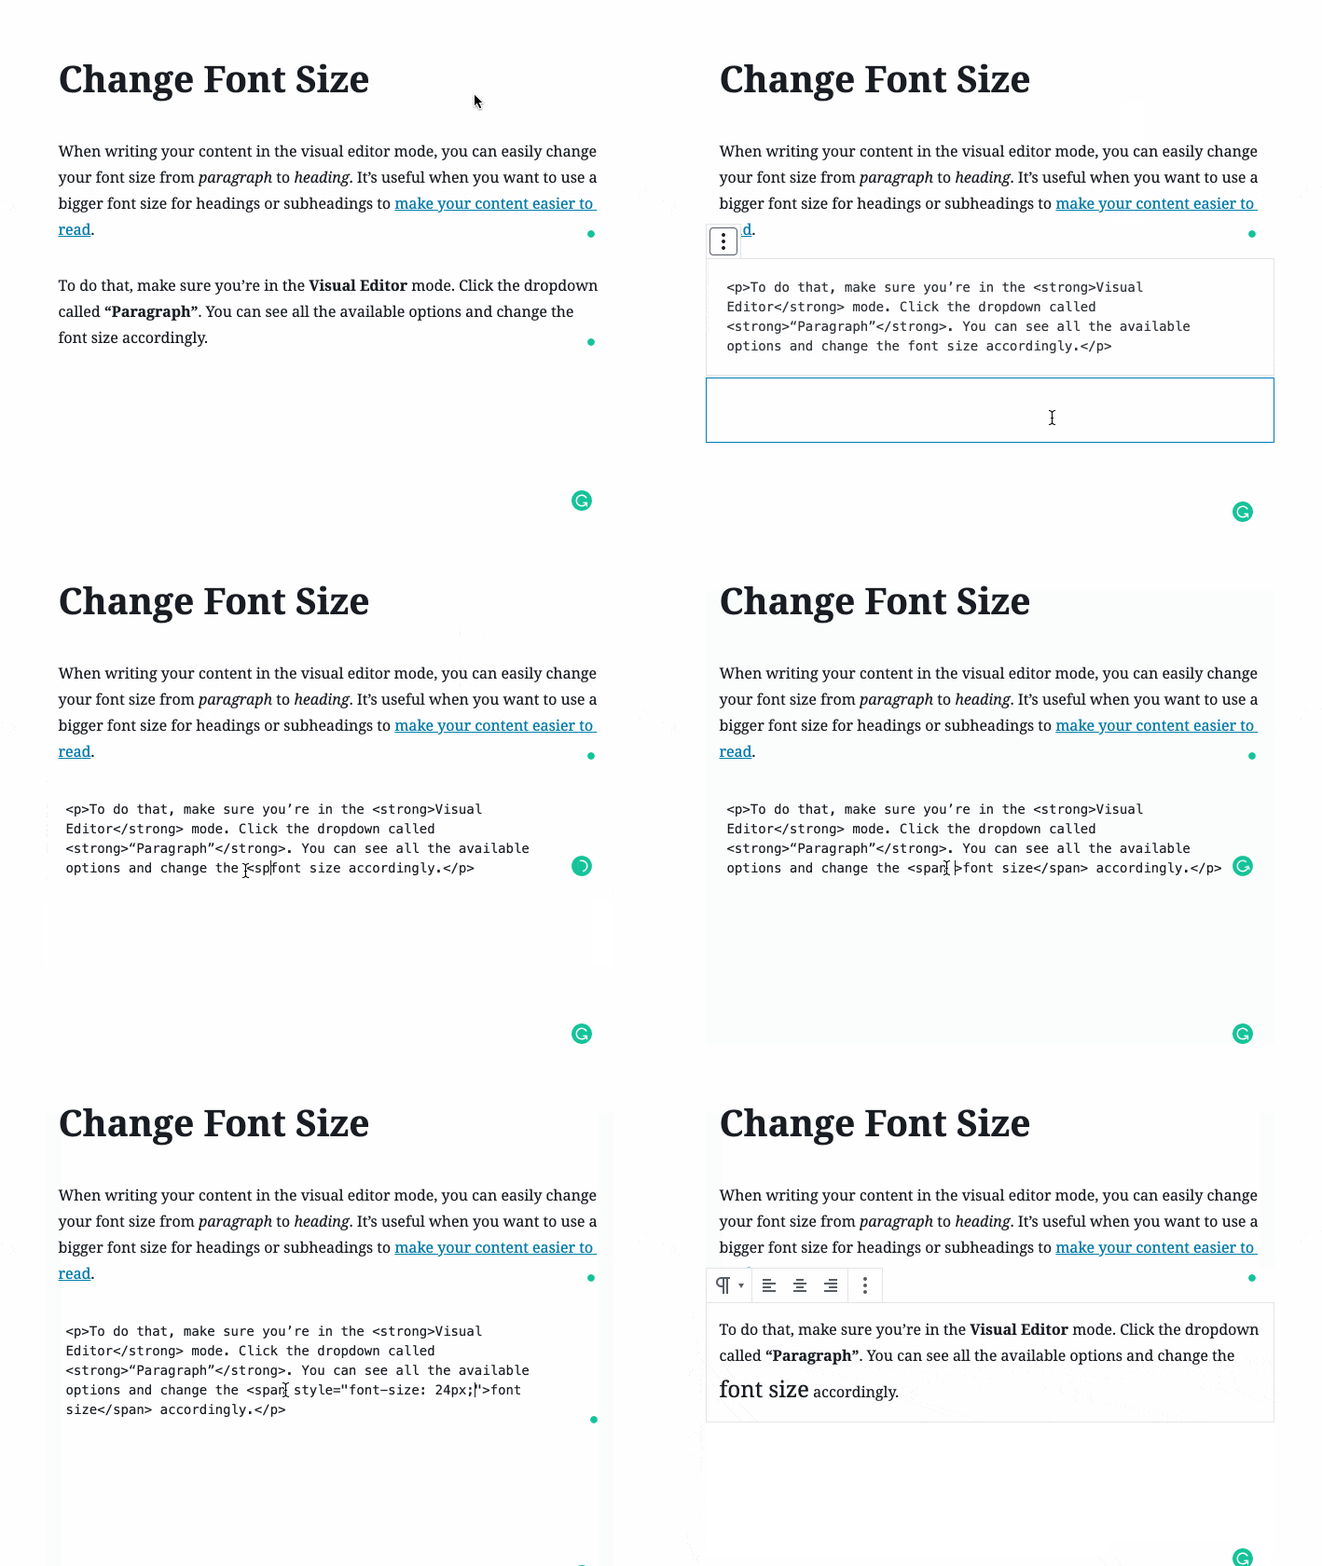
The CSS properties for the font size is font-size, as for the element we’ll use span element. So if we want to set font size to 24px, we’ll wrap the text with this code <span style="font-size: 24px"></span>. Do ensure you’re on the text editor mode.
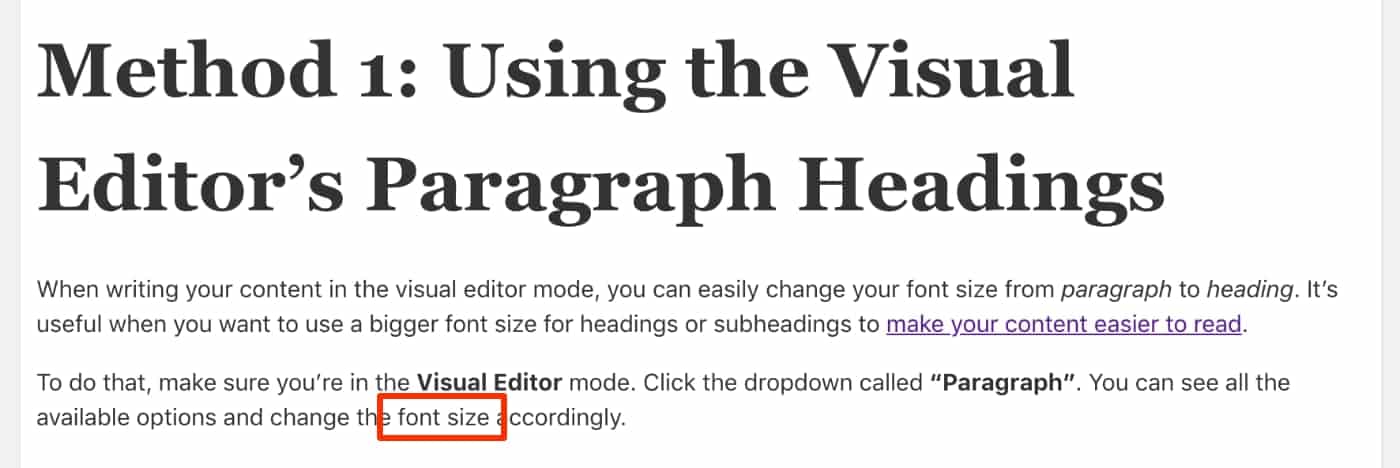
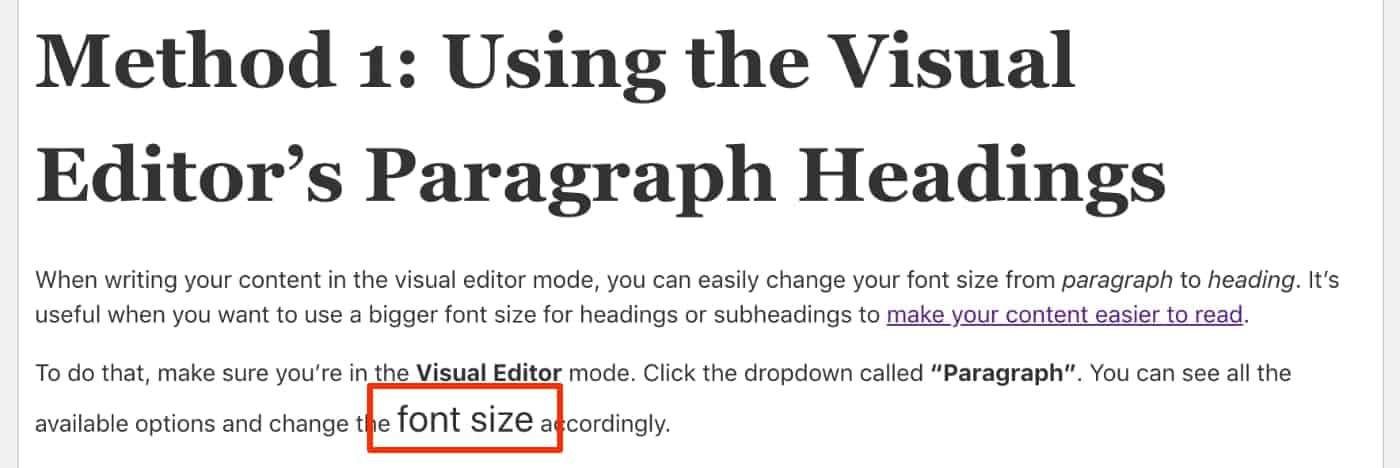
In this example, I’ll make the word “font size” bigger by changing its font size to 24px.
Now, switch to Text Editor mode and add the HTML code.
Like this:
It will look like this:
Gutenberg Editor
If you’re using the Gutenberg editor, you won’t see the Text Editor mode. Don’t be alarmed.
To insert inline CSS, select the block and click the 3 vertical dots to show more options. Choose “Edit as HTML”, and insert the code.
Method 4: Using Child Theme CSS
You could change font size in WordPress theme.
Actually:
Changing font size via child theme CSS is the way to go.
While you could do it in your theme CSS, it’s recommended to create a child theme before making any changes.
Why?
With child theme:
- You could keep your font size consistent
- You could change multiple elements’ font-size
- You won’t lose your changes when you updated your theme
Once you’ve created your child theme, open up the style.css file. With the child theme CSS, you could change font size of several elements including the default font size for your website.
Refer to the following examples:
If you want to learn more about CSS, CSS Tricks is a good starting point.
Final Thoughts
I hope you found this article useful in learning how to change the font size in WordPress. You might also want to see our tips to boost your social media sharing.
For more details on how to set up your own blog, check out our step-by-step guide. Or, let us create your blog for free. Find out more details here.
Don’t forget to share it with your friends.
If you have any questions or thoughts, drop a comment below or contact us here.
Yuyu
I am a front-end developer and I teaches entrepreneurs who want to grow their audience, start an online business, and pursue their dream life. When I spend time away from the computer, I enjoy reading books and having a cup of green tea.
10 Comments
Add comment Cancel reply
This site uses Akismet to reduce spam. Learn how your comment data is processed.

I needed to change some font sizes on my website.
After reading this article, I tried to implement it. It worked.
Thanks, man!
You’re welcome, glad it helped!
It actually took me longer than I’m proud to admit to figure this out 😂. I still have some old posts that look awful thanks to a bad font size. Thank you so much, as always, for your helpful tips!
You’re welcome, Sara. I’m glad this simple post could be useful to you.
Beautifully crafted post. I think every blogger who’s interested in making their blog posts beautiful and readable is going to find this very helpful. I did. Thanks for sharing.
Thank you, Patrick. I tried to explain how easy it is to change the font size in WordPress posts and pages. You can change the font size in WordPress theme too by applying the changes in your child theme. Glad it helps.
Thanks for the tips! I really want to change my font on my WordPress site because I just want to be creative. I am going to use these tips! Thanks!
Thanks. It’s time to be creative 🙂
YuYu, that is awesome stuff, man. I have wanted to do that for a long time. Also, I appreciate your warning about the difficulty if you change themes later, and the alternate/better ways to do it at the end. Nice article!
Mike
Thanks, Mike. I spent plenty of times updating the font size when I changed my theme. It’s a painful thing to do. Hope no one else would go through that experience.