After you read up on my post and successfully created your WordPress blog on Google Cloud, you’ll notice that your blog address is just a bunch of number. It ain’t pretty or memorable.
That’s your IP address, it looks horrible to your audience and clearly, it doesn’t look professional.
In this post, I’ll show you how to register a domain name and add it to your Google Cloud account.
When we are done, you can access your site by going to http://www.yourdomain.com
Let’s get started!
Disclosure: This article contains affiliate links. If you choose to buy through my link I will get a small commission at no extra cost to you. Thank you so much for your support.
Step 1: Register a Domain Name
I always buy my domain name from NameCheap as it’s reliable and you’ll get 1-year FREE WhoisGuard.
Before you can register a domain name, you need to know what domain name you want to get for your blog.
Keeping your blog’s name simple and memorable is important.
Getting the right domain name for your blog will take time. Not only you need to check if the domain is available, but you need to check if the social media username is available as well.

The most mistake people made is they registered a domain for their blog, work on their blog and when they wanted to set up their twitter account or Facebook pages, they realized the username is taken.
If you have a hard time finding the right domain name, you could use domain name generators that work great to get the right domain name.
Once you have found a suitable name, you’re ready to register a domain.
Enter your domain name below and register with NameCheap.
Find a domain starting at $0.48
powered by Namecheap
The Whois database is accessible to anyone on the internet. What does it mean to you?
It means:
When you register a domain, you are exposing your personal information such as name, address, email and phone number to spammers, marketing firms, and online fraudsters.
WhoisGuard was designed to protect you, the domain owner, so your confidential information is no longer available for public consumption.
[clickToTweet tweet=”Register domain name with NameCheap and get 1-year free WhoisGuard” quote=”Register domain name with NameCheap and get 1-year free WhoisGuard”]
Step 2: Set up Google Cloud DNS
Login to your Google Cloud Account to set up the “Cloud DNS” so that it can be used to link your domain.
Cloud DNS is a scalable and reliable Domain Name System (DNS) running on Google’s infrastructure.
But before that:
We need to configure a Static IP address for your WordPress site.
You might be wondering why? Didn’t Google Cloud set up your IP address automatically when you deployed your site?
That’s right.
But what would happen now is that if you start and stop your Compute Engine (CE) instance — your “server”, Google Cloud will automatically assign a new IP to your server and when that happens, it will screw up your DNS configuration.
So to prevent that from happening, we need to reserve a static IP address and assign your VM to use that.
Let’s get to it.


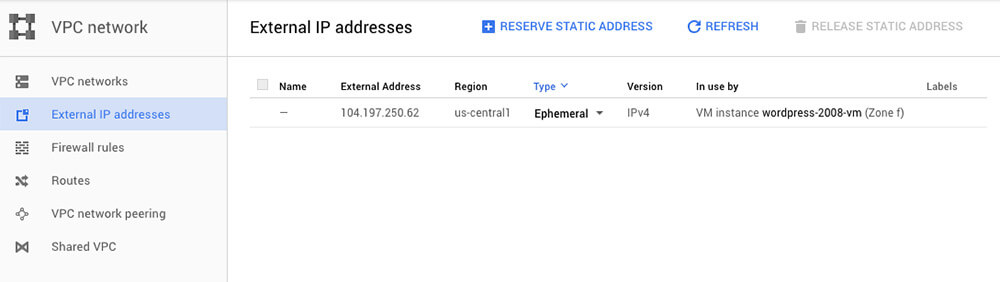
From your Google Cloud dashboard, scroll down to “VPC network” and click “External IP addresses”.

You should be able to see an IP address there of type Ephemeral. Click on the “RESERVE STATIC ADDRESS” button.
You have to fill in the details for the static IP address.
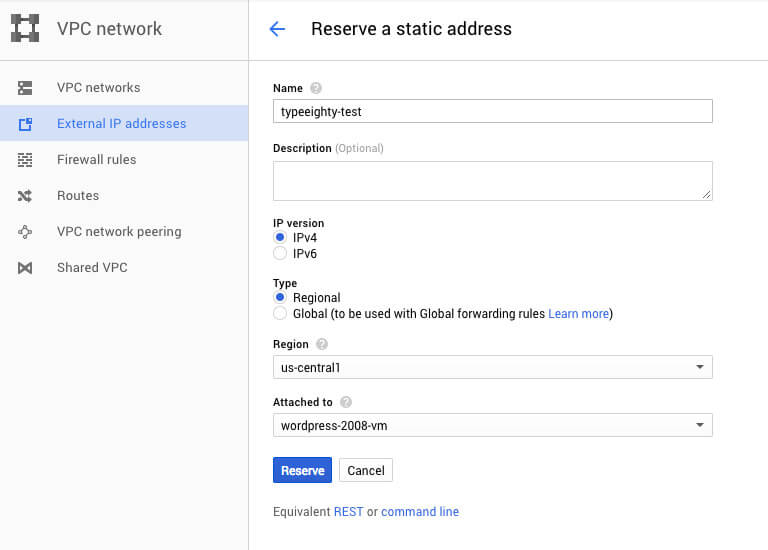
Name: You can use any name make it as descriptive as possible.
IP version: You can leave it to IPv4
Type: You can leave it as Regional as you won’t need to set up any load-balancing at this stage
Region: Choose the same Region as the VM you created.
Attached to: You need to select the VM instances where you deployed your WordPress site.
Click “Reserve”.
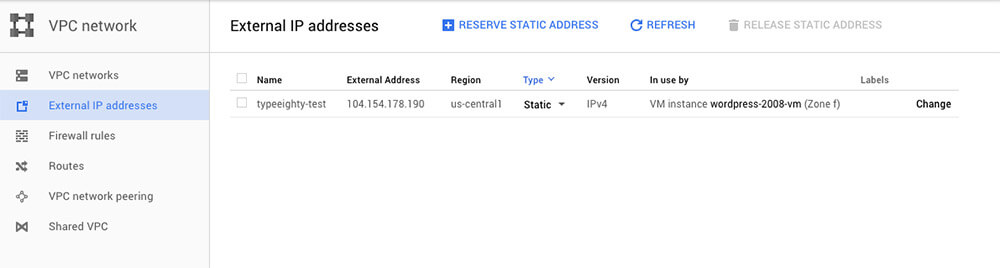
Sit tight and wait for the process to finish.
You should see the new Static IP address created and used by the VM instance you created previously.
[clickToTweet tweet=”How To Add A Domain To Your Google Cloud” quote=”How To Add A Domain To Your Google Cloud”]
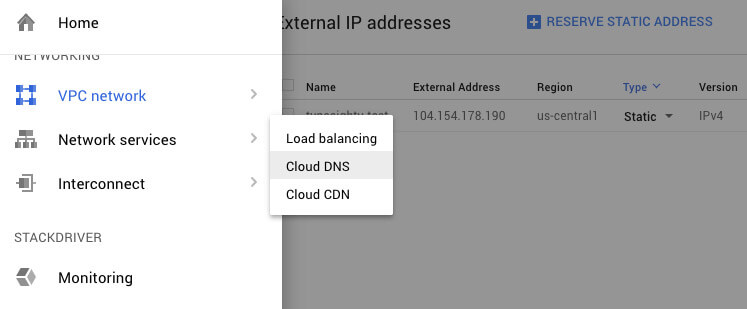
It’s time to set up the Cloud DNS. Scroll down to “Network services” on the sidebar and click “Cloud DNS”.
We are going to create a new zone name for your domain. Click on “CREATE ZONE”.

Simply type in your domain name as the DNS name and click “Create” button.

Google Cloud will create nameservers that you can use for your domain.
Your zone details will look something like this.
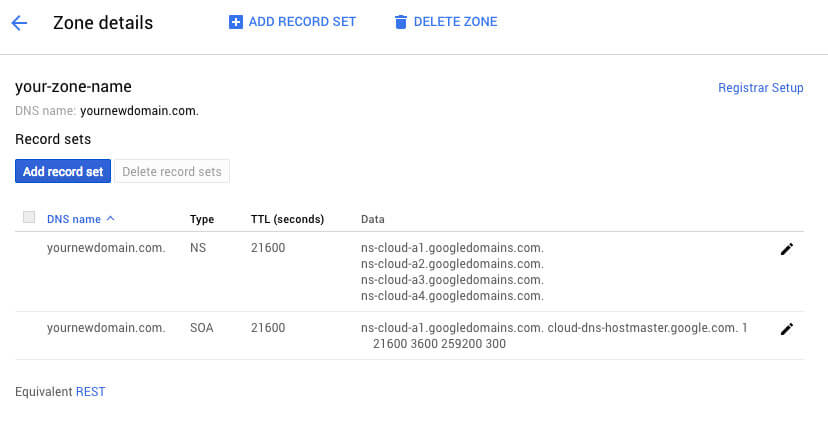
Next, we will add all the required record set to the zone.
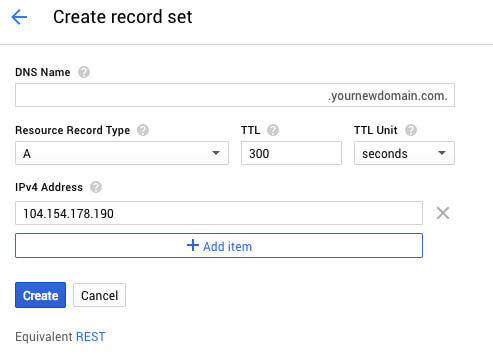
1. We add an “A” record set. “A” record is used to specify the static IP address we created earlier. Basically, this is will point your domain to your server.
DNS Name: Leave it as it is.
IPv4 Address: Enter the static IP address that you created earlier.
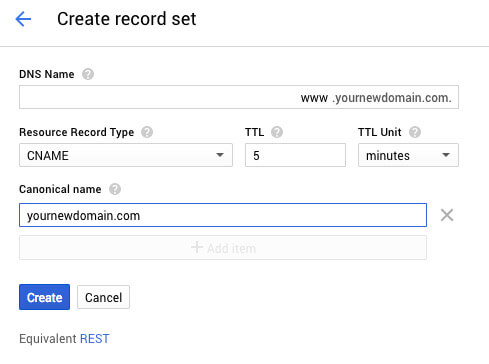
2. We add a “CNAME” record. This will allow people to access your website with or without www.
DNS Name: Enter ‘www’.
Canonical Name: Enter your domain name.
Once set up, you can access your website by going to http://www.yourdomain.com or http://yourdomain.com
Finally, your zone details should look like this.

We’re all set with Google Cloud DNS.
[clickToTweet tweet=”How To Add A Domain To Your Google Cloud” quote=”How To Add A Domain To Your Google Cloud”]
Step 3: Update Domain Nameservers (DNS)
Now that we have configured the Cloud DNS on your Google Cloud account, we need to update your domain nameservers.
Login to your domain registrar account where you registered your domain.
If you registered your domain with Namecheap, click “Domain List” on the sidebar.
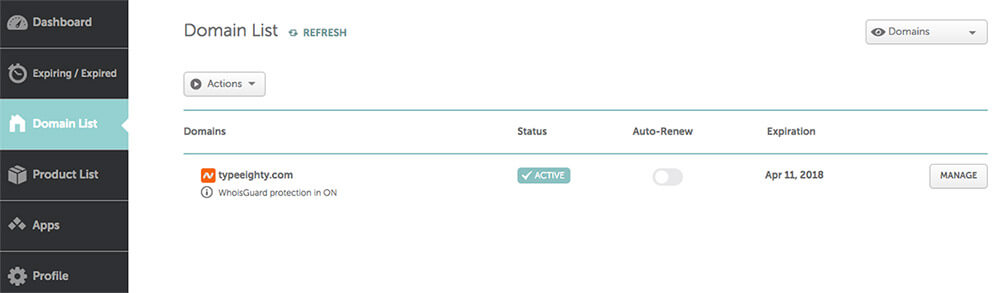
You’ll see your domain name with its expiration date. You can turn on the auto-renew if you want Namecheap to renew the domain automatically.
Click “Manage”.
If you are using GoDaddy or other registrars, login to your account and select your domain.
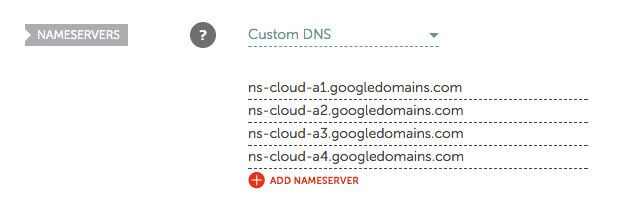
Scroll down to “Nameservers” and Select “Custom Domains” from the drop-down.
Voila, you’re done.
Final Thoughts
Congratulation!
You have registered a domain for your website and added your domain to your Google Cloud account.
At this point, you can type in your domain and you will be able to see your website. Next, you could add your new domain to Gmail for free.
If you can’t see your website, don’t panic. Stay calm.
Any changes made to your domain nameservers (DNS) might not reflect immediately. It could take up to 24 hours, so just take a short break and try again later.
Have a question? Let us know in the comments.
Thanks!
Super helpful 🙂
Thank you, it is a very informative article!
Thanks, Eduard. Let me know if you have any issue with it.
Awesome info. bro, it is really helpful for a blogger and techie like us . Keep going on.
Thanks for the kind words Ajay. It is! Glad you find it helpful.
Great information.
Thank you!
Helpfull Indeed
Thanks. Let me know if you have any question.