I launched my blog with FREE hosting using Google Cloud.
You might be wondering how could it be free?
Well, when I started working on my blog a few months ago and even at this point of time, Google Cloud is offering $300 credits which could last you for 12 months.
I am a curious learner.
I’ve set up WordPress sites on different hosts before and the process was easy.
How different would it be with Google Cloud?
And so, I decided to give it a try.
Pros:
- One-click launcher installation
- Full control of your website
- Free for first 12 months
- Scalable
Cons:
- Needs to have a bit of technical knowledge to know your way around
- No control panel unlike shared hostings
- No free domain or email address
If you prefer to have a control panel where everything is set up for you, I suggest you go with a shared hosting like SiteGround.
I have good experience running a WooCommerce site on SiteGround. In fact, I upgraded the hosting plan from GrowBig to GoGeek, so I can make use of their Cache system which is awesome.
Let’s get started.
Set up your Google Cloud account
Step 1: Head down to https://cloud.google.com/free/ and click on “TRY IT FREE” button. You will be prompted to log in with your Google account.
Step 2: Simply agree and continue to receive $300 credit to spend on Google Cloud Platform over the next 12 months.
Step 3: Fill up your details such as name, address and payment method.
Another thing I like is how Google Cloud won’t auto-charge your card after the trial ends. So if you decided not to continue with it, don’t upgrade your account.

[clickToTweet tweet=”How to Start a Blog with Google Cloud for Free” quote=”How to Start a Blog with Google Cloud for Free”]

Create a new project
So now that you have setup your Google Cloud account. The first thing to do is to create a new project for your WordPress site.
By default, Google Cloud will create “My First Project” as your.. erm.. first project.
Step 4: Click on the project dropdown and click on the “+” button to create a new project.

Step 5: Enter your project name. In this example, I called my project “TypeEightyBlog”.
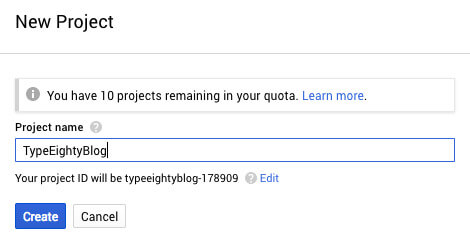
At this point, you should see the new project on your dashboard.

[clickToTweet tweet=”How to Start a Blog with Google Cloud for Free” quote=”How to Start a Blog with Google Cloud for Free”]
Install your WordPress site
Now that you have created a project for your blog, it’s time to install WordPress.
If you ask why WordPress, WordPress powers almost 27 percent of the entire internet and there are more than 47,000 WordPress plugins that you can use to design your blog. Do check out this WordPress statistic by TytonMedia if you’re still not convinced yet.
Step 6: Navigate to the “Cloud Launcher” on the sidebar and click on “WordPress” under Virtual Machine

Google Cloud provides you with estimated monthly cost breakdown based on the Virtual Machine specification.
Step 7: Click on the “Launch On Compute Engine” button to proceed.
Step 8: This is the final step before Google Cloud installed WordPress for you.

There is quite a lot of information here, let’s dive in.
Deployment Name: It can only contain lowercase characters, numbers or dashes.
Zone: There are 5 regions available, you should choose region and zone that’s closer to your target audience to reduce network latency and make your site loads faster.
Machine Type: This shows how powerful your virtual machine will be. As a start 1vCPU is more than enough to get you started.
Administrator Email: Enter your email that will be used in case you need to reset the password.
Disk Type: Select SSD Persistent Disk for faster disk performance.
Disk size in GB: Generally, 10GB is enough to get started with.
Do make sure “Install phpMyAdmin”, “Allow HTTP traffic” and “Allow HTTPS traffic” checkboxes are checked.
Click Deploy and sit tight!
Step 9: Congratulation! Your WordPress site has been deployed successfully.

Do take note of the WordPress Admin password and MySQL password.
Click on the “Visit WordPress site” button or the site address which is an IP address and voila! You will see “Wordpress on Google Compute Engine”.
If you want to access the admin panel, navigate to http://<your_site_address>/wp-admin


Final Thoughts
Congratulation!
You have now set up your WordPress site on Google Cloud free for 12 months.
You probably can’t wait to install new themes, plugins, design your site or start writing your blog. There’s just so many things to do!
What’s next?
Next, we are going to register a domain name for your site and add your domain to your Google Cloud account.
So you can access your website by typing in your domain.
Bonus: You can also install a free SSL cert from Let’s Encrypt just like I did with my site so you can have that nice green lock icon next to your domain.
Have a question? Let us know in the comments.
Hey, great info!
I just lunched a wordpress blog on google cloud, but im not that sure on this, is this a fast enough way compared to normal web hostings like hostgator? I dont have much experience on hosting, im just saying this because Jetpack plugin reported two down times of server in 3 days, may be this is normal i dont know, CPU is also good n1-highcpu-8 (8 vCPUs, 7.2 GB memory).
What do you think, is google cloud good choice for a 300, 500 daily visitor blog or would you prefer hostgator kinda web hostings?
Thanks!
Google Cloud should be fast enough compared to other web hostings and your CPU setting should be good as a start. I set up my blog on Google Cloud and have never experienced any downtime.
Server downtime could be caused bad plugins or themes installed on your site. You could try to install the P3 plugin on your WordPress site to figure out plugins that might slow down or even crash your site.
I would still give Google Cloud a try with its $300 credits and figure out what causes the site to crash 🙂
This is awesome and worth trying. Thanks for sharing
You’re welcome, hope it helps.